
-
Introduction to the Blender Interface 8 lectures
Modeling rigid objects2 Topics -
ModellingModeling organic objects2 Topics
-
Scaling Rotating and Transforming3 Topics
-
Texturing and Light settingsUnderstanding ways to illuminate a scene2 Topics
-
Rendering the final output2 Topics
Quizzes


Creating beautiful renders of your 3D model using V-Ray.

John May 23, 2019

In this article I will be talking about my workflow to create a real time rendered 3D scene in Sketchfabbased on Vray realistic lights and textures.
It does not matter what software you use to model your objects since what I am going to show you can be applied to other applications that Vray (or any similar rendering plugin) can support. In this example I used 3ds Max and Marvelous Designer for modeling and Vray for lighting and texturing.
Modeling the scene
Modeling is a huge subject and it’s really hard to cover every modeling step, but here you have some issues that you need to take into consideration while you are modeling your objects.
Delete all the faces that are not visible to the viewer (things like the the sofas back and the table bottom) as shown in the images below.This will give you faster rendering time and a better texture resolution.
Avoid high density models and always try to optimize. You want your Sketchfab model to run smoothly on most computers and also it is easier to unwrap later on.
Always remember to check your normals make sure that the face directions are correct.
Grouping and Unwrapping
In this phase we will start by adding the textures and not worry much about the tiling, since it is going change after unwrapping the objects.
After, you need to attach all parts of each individual object together, and always give them easy recognizable names (Small Table / Chair / Sofa / Sofas pillows / Books / Carpet ). (Each color indicates one object).
For the walls, the floor and the ceiling we need to deattach the inner faces and forget about the outers, only the inner faces are going to be baked and taken to Sketchfab. (Green inner / red outer)
Here are settings that I used to unwrap my objects:
After unwrapping the objects you need to edit the tiling from the materials editor:
Baking the textures
Baking the textures can take a long time to render. In most cases fixing the issues afterwards will take you a lot of time, so here are some things that you need to take into consideration before baking your textures.
After setting up all the lighting, render some clear shots for the whole space and make sure that every corner is covered and looks right:

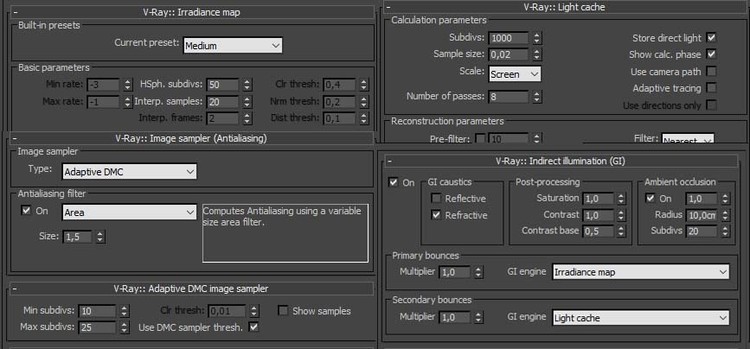
Here are some of the settings that I used. It is up to you to use the settings that you want I am using Vray camera with Vray sun:
- Before you start baking the textures make sure to turn off the Ambient occlusion, it will not give good results when it comes to baking.
- If you are using physical camera, make sure that you are in the physical camera display.
- Do not bake all the objects together, do some tests first.
The larger the object is the bigger the texture must be: 2048 x 2048 for walls, floor, ceiling; 1024 x 1024 for large furniture, table, sofa, lamp; 768 x 768 for small furniture; and 512 x 512 for accessories.
Note that you can go higher depending on computer power, but keep in mind that very large texture maps can also slow down the display inside the Sketchfab viewer so try to stay within the range shown above.